Knowledge Base
Contact Information
OBE/CRL Communication and Support
FreightSaver OBE/CRL Hotline – 888.274.6676
OBE@Freightsaver.com
VP of Client Engagement
Brad Phelan – Office 657.226.0708
Cell Phone – 586.909.1970
Brad@Freightsaver.com
FreightSaver OBE/CRL Tech Support – 833.206.4036
Tech@freightsaver.com
Technology Manager – Eric LaFlam – 657.226.0852
Carrier Invoice Received in Error – AP@FreightSaver.com
Claims Support and Process – Claims@FreightSaver.com
Tracing – 800.923.9507 – FreightTrack@FreightSaver.com
Invoicing – FreightSaver Invoicing address:
Third Party Freight Prepaid
FreightSaver
337 S Main Street, Suite 200
Rochester, MI 48306
All invoices must be sent electronically to Invoicing@FreightSaver.com
Operations Leaders
Gabe Preston – Team Lead – 657.226.0848
Zach Barton – Team Lead – 657.226.0846
April Cottis – LTL Team Lead- 657.226.0814
Carrier Development
Contact Information
Email – Carrierdev@freightsaver.com
Christopher Renne – (714) 472-3878
Matt Baldwin – 657.226.0859
Skip To
Part 1 - Introduction
Part 2 - Tracking
Part 3 - Summary
Part 1 - Introduction
LOGGING IN
Quick Reference Video Summary:
- Using the URL (freightsaver.com) you’re provided to access the site, click the green Log In button in the top right corner.
- Once you Log In to the system, you will have the option to save the credentials for future use, and you will be brought directly to the front office Dashboard
DASHBOARD
Quick Reference Video Summary:
- This is the first screen visible once a customer logs in to the customer portal
- This screen will show you recent shipment information, with useful graphs to help visualize shipment data
- High level shipment statuses will be visible as well, so that it is easy to be aware of the various status shipments move through
- Reports & Tools are available from the Dashboard as well; customers can view Shipment History, Quote History, Customer Reports, Statements, Address Books, Product Catalogs, and Carrier Summaries
CREATE A QUOTE
Quick Reference Video Summary:
- Click Start a New Order from the Customer Portal Dashboard
- Users will see a 3 step booking process
- Shipment Quoting is the first step of the 3 step booking process
- Required fields are denoted by a blue line in the front of the free text field
- Origin and Destination Zip Codes are required, as well as the Commodity details in order to generate a quote
- If you do not know a shipment’s class, you can use the class estimator after entering the weight and dimensions of the commodity
- Clicking ‘Add Favorites‘ from the Commodity Information line will allow you to add a Commodity to your product catalog for future use
BOOK SHIPMENT
Quick Reference Video Summary:
- After clicking Start a New Order and finishing the first step of the booking process (Shipment Quote), you will move on to the second step, which is actually booking the shipment
- After Generating Your Smart Quote you will be presented with your carrier results that are options for the provided lane
- You can either save the quote to your quote history when clicking Save Quote, or you can click Select in order to move into the second step of the booking process with the carrier quote selected
- Customers will fill out the Address information for the origin and destination location, along with things like instructions for pickup and delivery, Order information for shipper Reference #s and PO #s, among other fields
- Once step 2 is filled out, customers will have the option to either go back to their previous step or move forward to review the shipment
- Step 3 is the Order Summary, and from here you can either Book Shipment or go back to the previous step in order to make additional edits
- The moment a customer clicks Book Shipment the order will be dispatched to the carrier
- Once reviewing the confirmation page after booking, you can view your BOL by clicking the red BOL button, which will allow you to review, send, print, or download the BOL for inevitable delivery
Part 2 - Tracking
SHIPMENT PROFILE
Quick Reference Video Summary:
- The shipment profile is generated once a shipment is booked and saved
- From the shipment profile, customers will be able to see:
- Shipment IDs
- Order Statuses with Timestamps
- Carrier Information
- Origin and Destination addresses and contacts
- Commodity Details and Pricing
- Shipment Profile Menu Options:
- New Shipment: allows you to create a new shipment from an already created shipment’s profile, so that users can create multiple shipments back to back with ease
- View Dashboard: brings users back to the customer portal dashboard
- BOL: allows users to see that shipment’s BOL
- Shipment Documents: allows users to add attachments, view the BOL, Labels, or Quote Sheet
- Duplicate: allows users to duplicate shipments; this still requires that a user generate a new rate quote on the newly duplicated shipment
- Activity Log: allows users to see front office activity for a particular shipment
- Update Status: allows users to update PRO #s and provide new shipment statuses
- Location History: allows users to view a shipment’s location history on a google map with pins to denote the different stops
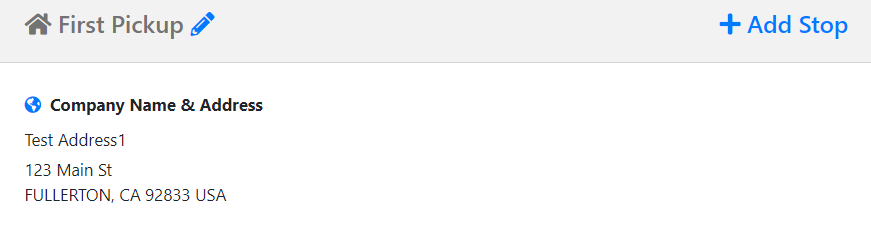
Shipment Profile - Add Stop
To add a stop to a shipment, go onto the shipment profile and find the Destination Information section. There will be an Add Stop link on the right. Once the Add Stop Modal opens, you will be able to fill in the sections with your Address Book and you can indicate the Stop Type as either Pick, Drop, or Both. You can also change the order of the stops by clicking the Arrow buttons under Priority on the left-hand side.
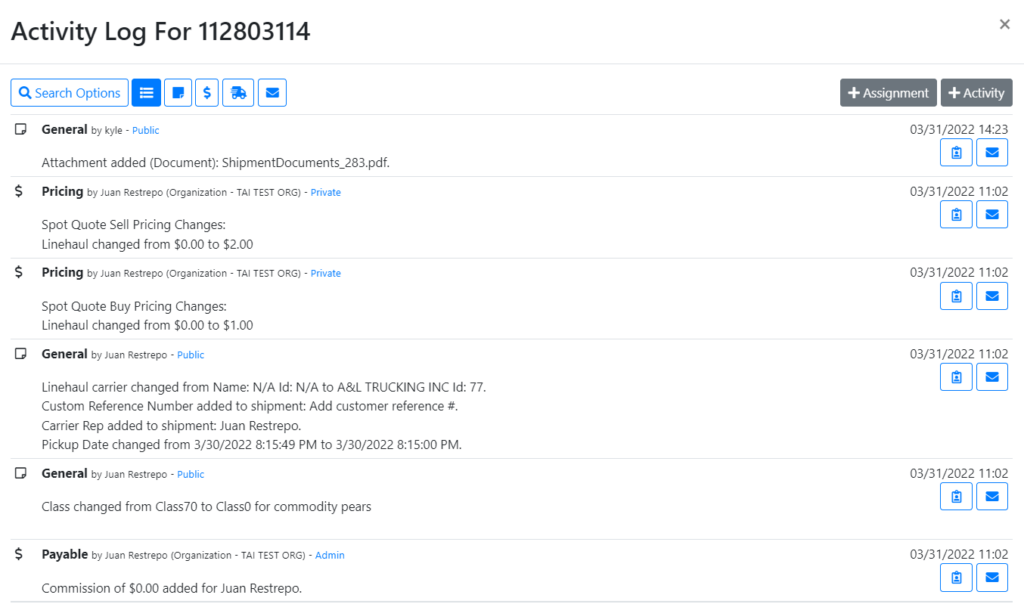
Shipment Profile - Activity Log
The Activity Log notes are automatically reported by the TMS, however, if you would like to manually add an activity, simply press Add Activity on the right side of the Modal. You cannot remove any activities that you add. You can use the Activity Log to communicate with your customers and other members of your organization. You can control who can see the activity through the privacy setting.
Included in the Privacy Setting:
- Private: Only users in your company can see this note
- Public: Both users in your company and your customers can see this note
- Admin: Only users in your company can see this note
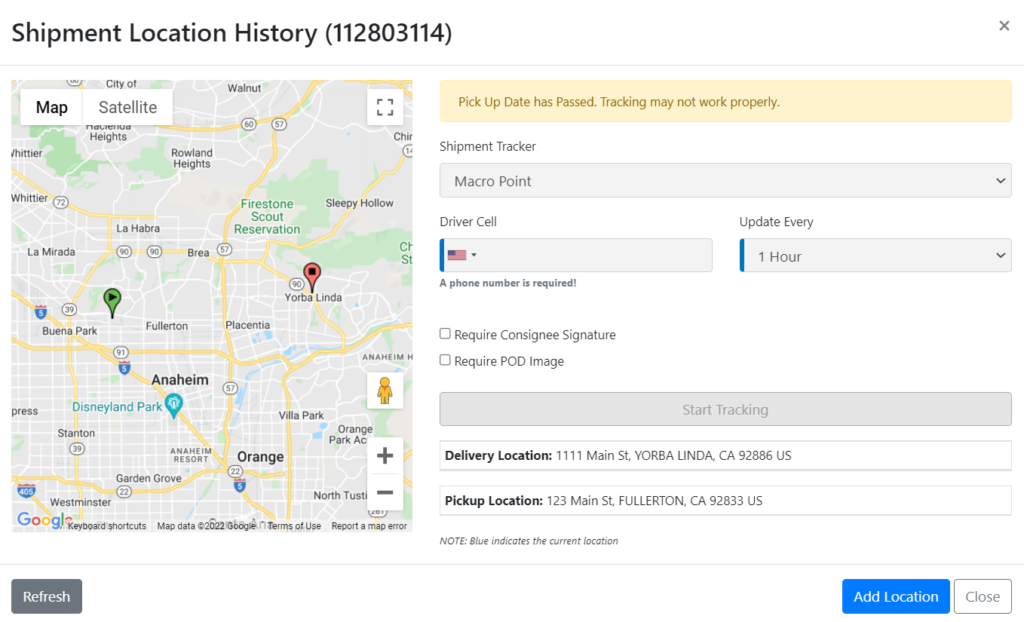
Shipment Profile - Location History
To access, go onto a Shipment Profile and click Location History. A Modal will pop up showing a map of the delivery. The green pin refers to the Origin and the red pin refers to the Delivery Destination. As you update the location, blue pins will drop onto the map, indicating the current location of the shipment. On the right are more details of the shipment including the Zip Codes and Remaining Miles. To add an update to the location manually, select the Add Location button and fill in the Modal. You will also receive automated location updates from EDI and API. The Location History will also be visible to the Customers in the Customer Portal.
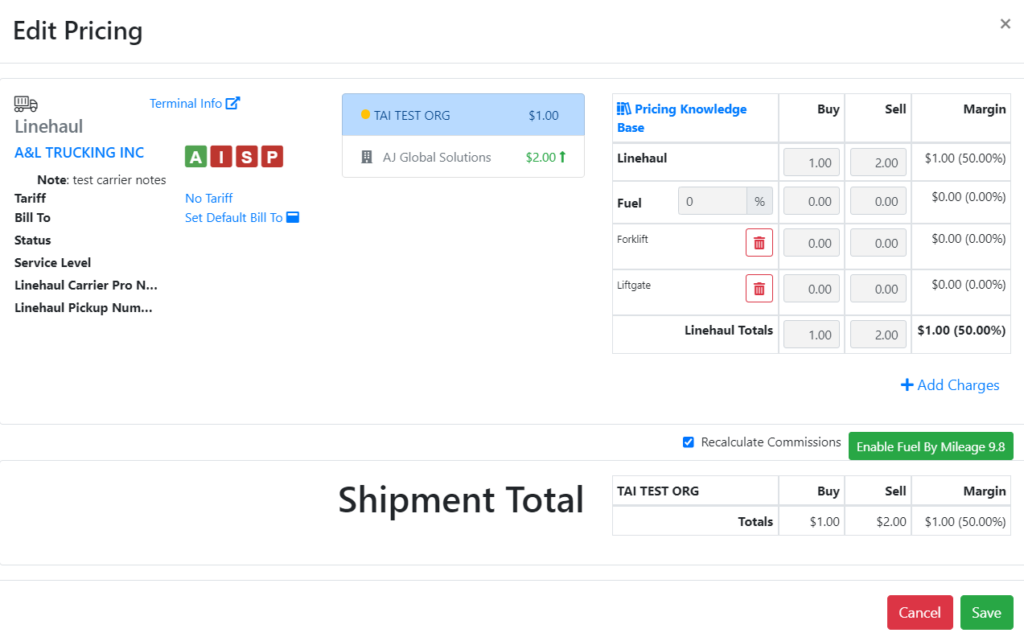
Shipment Profile - Edit Pricing
You can access Edit Pricing in multiple ways. There is a blue Edit Pricing button on the top right side, it is also under Cost Calculations, and Shipment Tools. The Edit Pricing Modal will have two rows. The first row is for the Buy Price and the second column is for the Sell Price. The first column is for the LineHaul Pricing, followed by the Fuel Percentage, the Fuel Rate, and then the Total. If you have Recalculate Sell with Default Margins checked off, your Sell rate will change as you change your Buy Rate. If the second column turns red, it means that there is a negative margin or no margin on the shipment
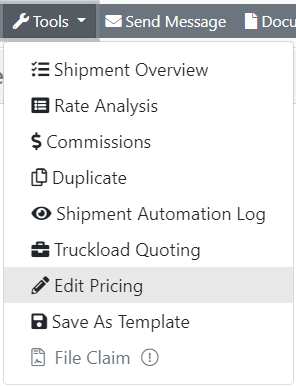
Shipment Profile - Shipment Tools
- Commissions: Can Modify or View Commissions on the shipment
- Duplicate: Duplicates order details into a new shipment profile except for the pricing information
- Shipment Automation Log: Provides API and EDI data. This is used mainly for IT Support
- Truckload/Volume Quoting: Allows you to post Load Boards and view DAT Rate Information
- Edit Pricing: Opens the Edit Pricing Modal
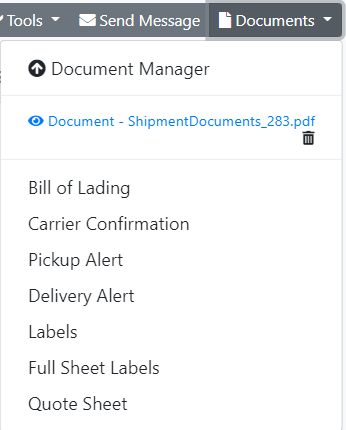
Shipment Profile - Shipment Documents
Types of Documents: (Can vary depending on the shipment)
- Bill of Lading
- Carrier Confirmation
- Pickup Alert
- Delivery Alert
- Labels
- Quote Sheet
Shipment Profile - Send Documents
Send Documents: Email, fax, print, or download documents
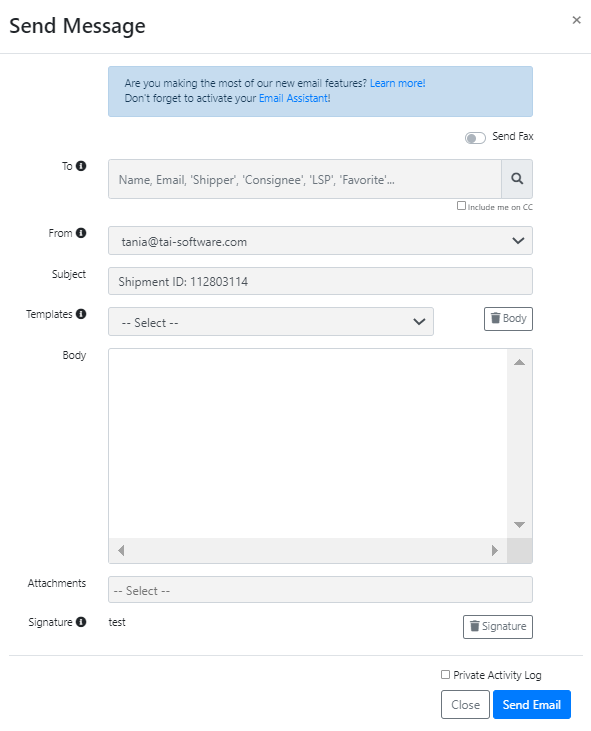
Shipment Profile - Attach Documents
Attach Documents: Attach and Label Documents. You can control the Access Level on who sees the document

TRACK & TRACE
Quick Reference Video Summary:
- The My Recent Shipments section of the customer portal will show you a high level view of your shipment statuses
- Clicking on these statuses will take you to the Customer Report, which will allow you to run a report for the specific shipment(s) to find out more information
- Any shipment reference numbers received can be searched in our Universal Search bar in the top right of the portal
- Users can also view the Shipment History, by clicking the Welcome Menu (in top right corner of every screen; same drop down that shows your username or Org. name) and then Shipment History
QUOTE HISTORY
Quick Reference Video Summary:
- Quote History is accessible directly from the Dashboard, or from the Welcome button in the top right where your user is displayed
- Quote History will only show non-booked shipments that are in Request for Quote status; these are quotes, and not real shipments, so items in this list will have to be booked in order to be considered a shipment
- Clicking the Shipment ID will bring you to the shipment Quote details where you will have the option to review the actual shipment and finalize it for booking
- This will show a quick reference of various quote details of the most recent quotes first
SHIPMENT HISTORY
Quick Reference Video Summary:
- Shipment History is accessible directly from the Dashboard, or from the Welcome button in the top right where your user is displayed
- This will show a quick reference of various shipment details of the most recent shipments first
- To get more detailed information about shipments, you can click on a shipment ID here to bring you to an individual shipment and review its specific information
Part 3 - Summary
CUSTOMER REPORT
Quick Reference Video Summary:
- This report allows you to pull shipment data on all shipments in any status from any time period
- Various filters are available to filter by things like carrier, date ranges, and so on…
- The report is a very powerful tool that allows customers to review their shipments in full data, and provides users the ability to export this data to Excel for easier review and data manipulation
CARRIER SUMMARY
Quick Reference Video Summary:
- The Carrier Summary is located in the Reports & Tools section of the Customer Portal
- This provides carrier information on a quarterly basis
- This will show things like shipment volume, weight, and revenue and rank all the carriers based on such
- This information is useful to find out who your top performing carriers are, and can be used to contact carriers for better rates or other research purposes
MY ASSIGNMENTS
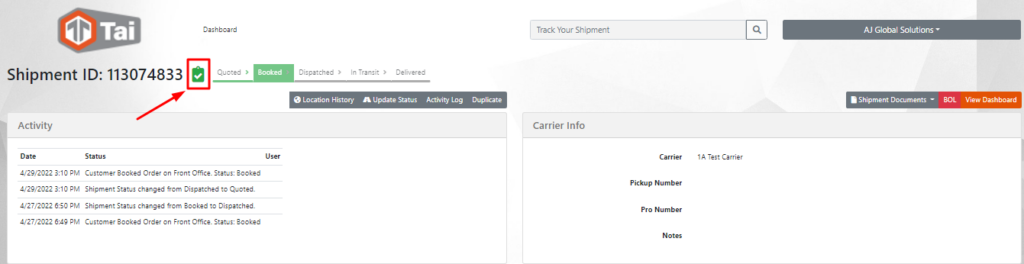
This article will show you how to utilize my assignments on the front office page.
The self-assign feature helps keep an eye on important shipments by adding them to the assigned list.
To assign a shipment, you need to: Login into the front office page > pull up the shipment > locate the badge icon right next to the Shipment ID.
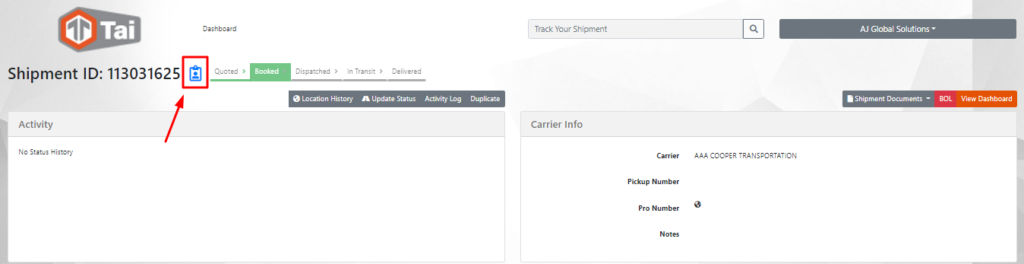
To mark an assignment as completed, you need to: Pull up the shipment > locate the yellow badge icon and click it; the icon’s color will turn green.
To see your active assignments, you need to: Go to the Dashboard > Under ‘My Recent Shipments’, select ‘Assigned Shipments.’
ullamcorper mattis, pulvinar dapibus leo.
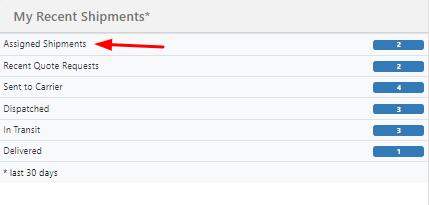
Note: It’ll only display active shipments. Shipments marked as completed won’t be on this list.
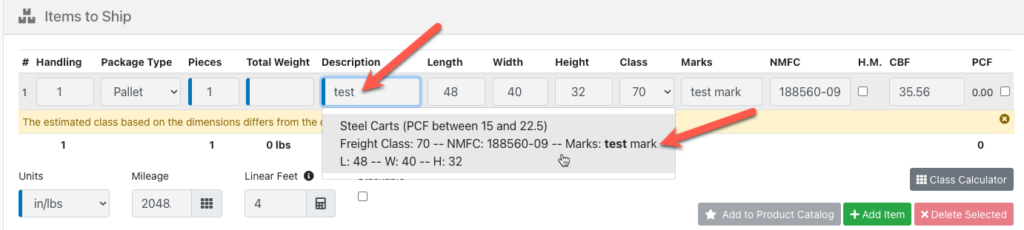
PRODUCT CATALOG
Quick Reference Video Summary:
- This is accessible from the Reports & Tools section of the Customer Portal Dashboard
- Product Catalog includes commonly used commodities for easy access and shipment creation
- Click Add New Product to add a new product, and fill out the required fields
- The Pencil Icon can be used to edit an existing products
- An Excel template is available from the Import/Export CSV button on the Product Catalog screen, so that customers can add multiple entries to their product catalog at one time
- This is also used to export details for easier review within the Excel environment
- Note: Marks can be entered into the product catalog on a per-item basis. Data entered into the Marks field is also searchable from the description field. This is helpful when using the Marks field to differentiate items.
TMS - GLOSSARY
Introduction
The Customer Portal is intended for your shippers so they can quote, book, and track shipments through their own user login. They can also manage their own address book and product catalog as well as many other features
How to Login
In order to log in, press the green Log In button on the top right of the screen. Fill in your Username and Password and press Remember Me for your computer to save your information. This will take you to the Customer Dashboard Page.
Dashboard
The pie chart on the left displays the different Modes of shipments in the past 30 days. To the right of that, there is Shipment Activity which displays a stacked bar with booked and quoted shipments in the last 4 months. In My Recent Shipments, you will see current shipment statuses and the number of shipments in each status. Next to that is Report and Tools, and then General Information
Shipment History
To access, click Shipment History under the Reports and Tools section on the Customer Dashboard or click the Welcome drop down, then Shipment History. Shipment History will display all of your shipments, listing your most recent shipments on top. To get more detailed information on the shipment, press the Shipment ID number
Quote History
To access, click Quote History under the Reports and Tools section on the Customer Dashboard or click the Welcome drop down, then Quote History. Quote History will display shipments that you’ve only received a quote for and haven’t booked yet. To book a shipment, click on the Shipment ID and from the Shipment Profile Page, click Book Shipment near the top right.
Customer Report
To access, click Customer Report under the Reports and Tools section on the Customer Dashboard. This report will allow you to get shipment data on most of your shipments. You will be able to filter these shipments by Carrier, Date Range, Invoice Statuses, Shipment Types, and etc. To export to excel, check off the box before clicking on Create Report
Statement
To access, click Statement under the Reports and Tools section on the Customer Dashboard or click the Welcome drop down, then Statement. The Statement will display a report of all your open invoices and credit owed to the broker. At the bottom you will see the totals and how past you are in certain categories. You can send, print, or download this statement by clicking on the respective buttons near the top of the page. The email will be defaulted to your accounting defaulted email but you will be able to send it to anyone you choose. The statement is updated in real time.
Address Book
To access, click Address Book under the Reports and Tools section on the Customer Dashboard or click the Welcome drop down, then Address Book. The Address Book will contain both origin and destination locations. The purpose of this tool is for you to store addresses so you can fill in orders more quickly. To Add a New Address, click the green button on the top right and fill in the Modal. The fields with the blue highlight are the only required fields but you will be able to fill in additional information. If you want to make an update to an existing address, click the pencil on the right side of the company. You can also use Excel to import all of your addresses. Simply click the Import/Export CSV drop down, then select Template to obtain the Excel Template. You will also be able to export your addresses, update them within the Excel and then import them back into the system.
Product Catalog
To access, click Product Catalog under the Reports and Tools section on the Customer Dashboard. The Product Catalog allows you to add Products and Commodities to your system so that you can fill in orders more quickly. To Add a New Product, click the green button on the top right and fill in the Modal. The fields with the blue highlight are the only required fields but you will be able to fill in additional information. If you want to make an update to an existing product, click the pencil on the right side of the list. You can also use Excel to import all of your products. Simply click the Import/Export CSV drop down, then select Template to obtain the Excel Template. You will also be able to export your products, update them within the Excel and then import them back into the system.
Carrier Summary
To access, click Carrier Summary under the Reports and Tools section on the Customer Dashboard. The Carrier Summary displays important information on your carriers, broken out over a quarterly basis. You can select the quarter by using the drop-down menu on the lest. It will display horizontal bar charts showing Carrier by Shipment Volume, Revenue, and Weight
Create Quote
To generate a rate quote, press the green Start a New Order button on the right side of the Customer Dashboard. Fill in the Origin and Destination Zip Code along with needed Accessorials and Commodity information. You can fill in the Zip Code manually or you can use the Company Name drop-down menu to select from your address book. If you don’t know the class of your order, you can fill in the Length, Width, and Height, the system will estimate a class for you. If you press add favorite, it will add the commodity information to your address book. To generate a rate, click the Generate Smart Quote button. This will lead to a page with all of your rate options. You will have an option to Save the Quote or Select it to book an order.
Book Shipment
To Book a Shipment, press the green Start a New Order button on the right side of the Customer Dashboard. You will have to complete the three-step process of filling in the Shipment Quote, Details, and Summary. After you Generate a Smart Quote, press Select for the desired Carrier for your order, and it will lead you to the Details page. If you fill in a new address on this page, you can click Add to Favorites on the top for it to transfer the information automatically to your address book. Next press Review Shipment, and it will take you to the Shipment Summary. To complete your order, press Book Shipment. You can retrieve your Bill of Lading by pressing the red BOL button and the top and you can send this document through email.
Shipment Profile
The Shipment Profile is generated after the shipment is booked. From the Customer Dashboard, you are able to search the Shipment Profile by entering the Shipment ID in the search field next to the Welcome drop-down. You can also click on a Shipment ID from the Shipment History Page. You will first see the shipment ID in the top of the page, then Activity Log Notes, Carrier Information, Origin and Destination, Commodity Information, Pickup Information, and Pricing. There will be multiple actions on the top right including, New Shipment, View Dashboard, BOL, Shipment Documents, Duplicate, Activity Log, Update Status, and Location History.
Track and Trace
To Track and Trace, you can use the links under the My Recent Shipments section or search a reference number into the search field on the top of the page. You can also track your shipments through the Shipment History page.